
The most common cause for an Epson L3110 or L3210 blinking light pattern is an internal ink pad reaching its service life limit. If the ink and paper lights alternate in a steady, rhythmic pattern, the printer has locked itself to prevent ink spills. You can verify this status by running the status monitor on the Epson printer support page.
Troubleshooting Epson L3110 L3210 Light Blinking
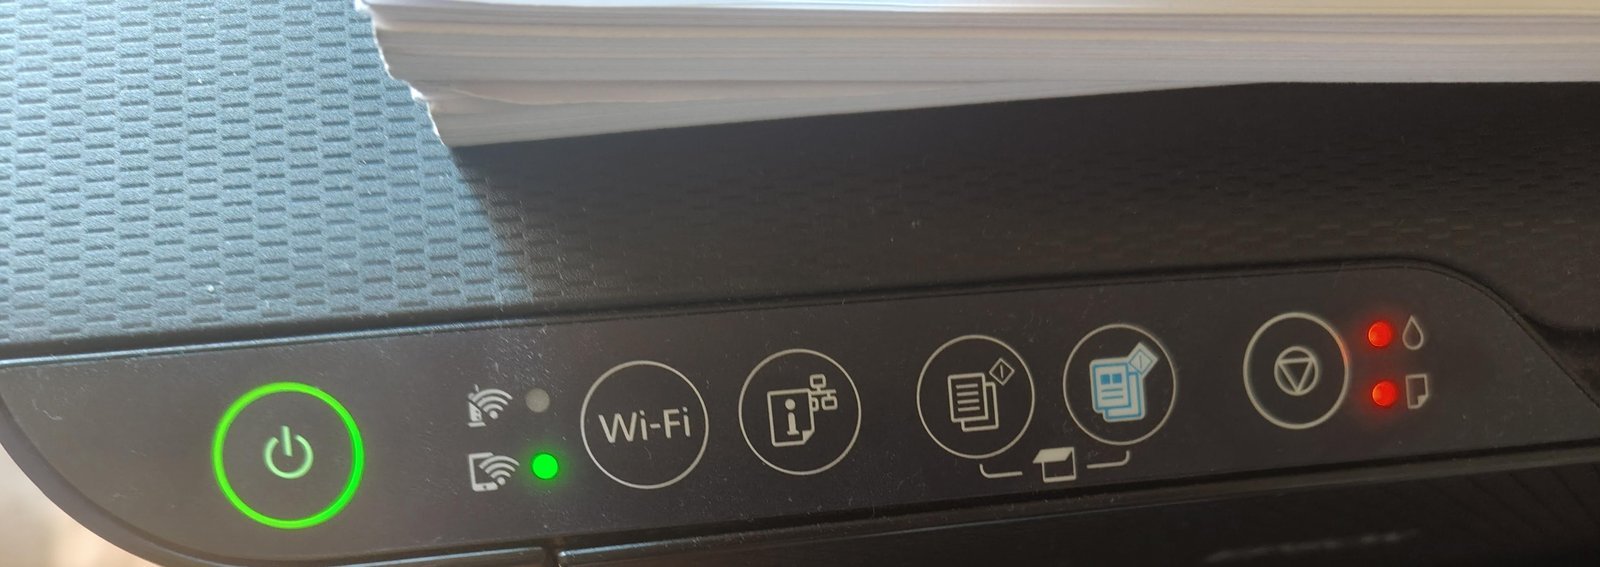
The blinking lights on your printer act as a diagnostic code. You must observe the pattern to identify the specific error state.
| What you notice | What it usually means | What to do first |
|---|---|---|
| Alternate flashing lights | Ink pad life ended | Use adjustment software |
| Paper light solid/blinking | Paper jam detected | Clear paper path |
| Ink light solid/blinking | Ink levels are low | Refill ink tanks |
| All lights flashing | General hardware error | Restart the printer |
Distinguishing between a solid and blinking light is the most common mistake. Both solid and blinking lights are used by the printer to communicate specific hardware or system error codes. If the printer is unresponsive, follow the manufacturer’s power-cycling instructions.
Use this decision rule: if the printer is silent, check the paper path for tiny debris. If the lights flash in a specific sequence, consult the printer’s user manual or the official Epson support website to identify the error code. Search that exact number online to bypass generic troubleshooting steps.
Ink pad life reached its limit
This error happens because the printer keeps a digital count of every cleaning cycle performed. These cycles flush excess ink into internal pads that sit at the bottom of the chassis. Once these pads reach their calculated capacity, the printer stops printing to prevent ink from leaking onto your desk or causing a short circuit. This is a factory-set limit designed to protect your hardware from damage.
To confirm this, open the printer queue on your computer and look for a message stating “Service required.” If you see this specific text, the internal counter has hit the maximum value defined by the manufacturer. If you don’t see this message, the issue might be a simple sensor error.
The fix requires resetting the internal counter using the specific adjustment utility for your model. If you’re a casual user, you may find third-party tools, but these carry risks; if you use the wrong version, you can permanently corrupt the printer’s firmware. The official adjustment utility is proprietary software intended for use only by authorized service technicians. If you aren’t familiar with system utilities, don’t attempt a reset, as this can void your warranty. When the reset is successful, the blinking will stop immediately, and the power light will remain solid. This assumes you’re using the correct utility for your specific firmware version; for newer models, the reset procedure may require a paid license key.
Paper feed or sensor obstruction
A blinking paper light often indicates that the printer can’t detect paper or that a scrap of paper is blocking the sensor. This happens when small debris, dust, or a torn piece of paper sits in the path of the rollers. The printer attempts to grab paper, fails to detect it, and enters an error state to prevent the rollers from spinning against an obstruction.
To check this, turn the printer off and unplug it from the power source. Open the top cover and use a flashlight to inspect the paper path. Look for small, ripped fragments or foreign objects like staples or paperclips. If you see debris, remove it carefully with tweezers. Don’t force the rollers to move by hand, as this can strip the plastic gears. Once the path is clear, plug the printer back in and turn it on. If the light stops blinking, the sensor has successfully reset.
You can tell this apart from an ink pad error because the paper light will specifically be the one indicating the problem, rather than the alternating pattern of the ink and paper lights. If the light continues to blink after clearing the path, the sensor may be faulty and requires professional service.
General hardware and motor failure
A general error occurs when the print head carrier can’t move freely or the motor encounters too much resistance. This happens if the carriage rails have lost their lubrication or if a piece of plastic has snapped inside the housing. The printer performs a self-test every time it turns on; if the carriage doesn’t reach its home position within five seconds, it stops and flashes all lights to signal a critical failure.
To check for this, turn the printer off and gently push the print head carriage to the center of the rail. It should move with very little resistance. If you feel it catching or hear a grinding noise, there’s an physical obstruction or a dry rail. You can apply a tiny drop of silicone-based grease to the metal rail, but never use oil or WD-40, as these attract dust and will eventually seize the motor.
This error is distinct because it usually happens immediately upon startup, before you even attempt to print. If the carriage moves freely but the lights continue to flash, the failure is likely in the mainboard or the motor encoder strip. This strip is a thin, clear plastic film with tiny lines that tell the printer where the head is located. If this strip is smudged with ink, the printer loses its position and halts. If cleaning the strip with a lint-free cloth doesn’t resolve the issue, the mainboard may need a professional diagnostic.
When to stop and get help
You must stop your troubleshooting efforts if you encounter the following conditions, as further action may lead to permanent hardware damage or electrical hazards:
- Burning smell: If you detect an acrid odor, immediately unplug the device and keep it disconnected, as this indicates a failing motor or shorted circuit.
- Leaking ink: If you see liquid pooling under the printer, don’t attempt to turn it on, as this poses a risk of electrical shock.
- Grinding metal: If you hear loud, metallic scraping noises, the internal gears are damaged and require parts replacement.
- Locked carriage: If the print head carriage doesn’t move even with moderate pressure, don’t force it, as you’ll snap the plastic drive belt.
- Software failure: If you can’t find the official adjustment tool or the software reports an “unknown error,” don’t use cracked or pirated versions, as these often contain malware.
At this point, you should contact an authorized service center. They have the specialized tools to reset the internal counters and replace damaged mechanical parts safely.
Frequently asked questions
Can I fix the blinking lights by just unplugging the printer?
No, unplugging the printer won’t fix a service-required error or a physical jam. Unplugging only clears the temporary memory, but the printer will run its self-test again as soon as it powers on. If the sensor still detects an error, the lights will return to the blinking state. You must address the underlying mechanical or software issue before the printer will return to a ready state.
Is it safe to keep using the printer if it’s blinking?
No, it isn’t recommended to keep using the printer if the lights are blinking in an error pattern. If the ink pads are full, continuing to print will cause ink to leak inside the machine, which can ruin the electronics or stain your furniture. If the print head is blocked, forcing the machine to move can strip the gears or burn out the motor, making the repair much more expensive.
How long does it take to reset the ink pad counter?
The reset process usually takes about five minutes if you have the correct software and a stable USB connection. You must connect the printer to your computer using a standard USB cable, as wireless connections are often too unstable for the reset utility to communicate with the printer’s firmware. Ensure your computer isn’t running other print jobs in the background while you perform this procedure.
Does it matter if I use a third-party ink cartridge?
No, using third-party ink doesn’t typically cause the blinking light error, but it can affect the ink level detection. The blinking lights mentioned here are almost always related to hardware maintenance or physical jams rather than the brand of ink. If you’re using third-party ink and the printer stops, check the physical sensors and the service life counter first, as these are the most common culprits.
What happens if I ignore the ink pad warning?
If you ignore the warning, the printer will eventually lock itself completely and refuse to accept any print commands. This is a safety feature built into the hardware to prevent damage from overflowing ink. Once the printer reaches this “hard lock” state, you can’t bypass it without using the official adjustment software to reset the internal counter to zero.
Why do the lights blink in different colors?
The color of the light identifies the system reporting an error. Green lights indicate status, while orange or red lights signal an alert. Flashing ink and paper lights together indicate a critical system error. Always check your printer’s manual for specific codes, as manufacturers may change these signals between production batches.
Final Thoughts
If you’ve successfully cleared the error, you’re ready to get back to printing your documents. It’s a good idea to keep an eye on your ink levels and perform regular head cleanings to keep everything running smoothly. If you run into any more trouble, don’t hesitate to check the official support site again.