A buildup of air bubbles or mineral deposits inside the internal tubing is why your keurig add water and heating lights blinking at the same time. You can fix this by clearing the air lock or running a thorough descaling cycle to remove the blockage. This issue typically happens when the machine can’t sense the water flow, causing it to stall during the heating process.
Keurig add water and heating lights blinking: Why it happens
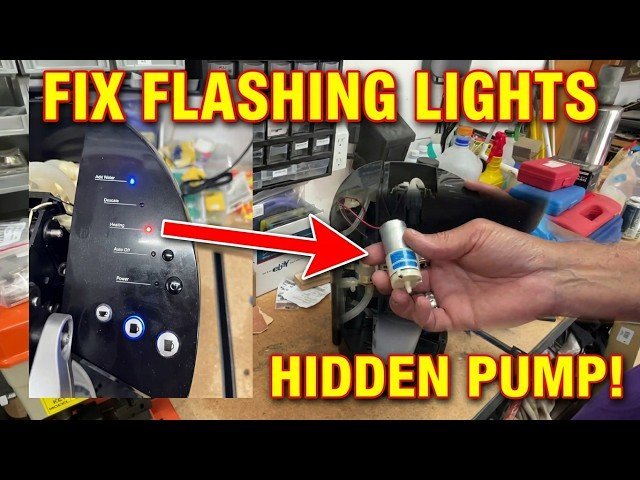
The machine uses a flow meter to track how much water moves from the reservoir into the heating chamber. When the system detects a discrepancy—either because there’s no water reaching the sensor or because the sensor is blocked by lime scale—it triggers the blinking lights as a safety alert.
The most common cause is an air lock. If you let the water reservoir run completely dry, air enters the internal lines. Because the pump is designed to move liquid, it struggles to push air through the narrow tubes. The heating element then shuts down to prevent damage from dry heating, which the Keurig official support guide notes is a protective measure for the appliance.
Another cause is mineral buildup. If you live in an area with “hard” water, calcium and magnesium deposits settle in the pipes over time. These deposits act like a dam, slowing or stopping the flow of water. Even if your reservoir is full, the water can’t reach the internal sensor, making the machine believe the tank is empty. Finally, a loose water reservoir filter or a misaligned magnetic float (the small plastic piece that tells the machine the tank is full) can trick the sensor. If the float is stuck at the bottom, the machine will always think the tank is empty, regardless of how much water you add.
Clear the air lock
This fix is for you if the machine was working fine until the reservoir ran dry. You need to force the air out of the line to reset the flow.
First, remove the water reservoir from the base. Check the valve at the bottom of the tank to ensure it isn’t clogged with debris. Next, take a turkey baster or a large syringe and fill it with clean water. Insert the nozzle into the reservoir’s exit port—the hole where water enters the machine—and forcefully push water into the hole. This pressure helps push the trapped air bubble back into the tank.
If you don’t have a baster, try the “burping” method. Fill the tank, place it on the base, and lift it up and down quickly three or four times while the machine is powered on. This movement can sometimes dislodge the air bubble. Once you have done this, press the brew button. If the lights stop blinking and the water begins to heat, the air lock is gone. This isn’t for machines with permanent, non-removable reservoirs; if your model has a fixed tank, don’t force water into the ports, as you may damage the internal valve seals. Check your manual for the specific bypass procedure if you have a plumbed-in or fixed-tank unit.
Run a descaling cycle
This fix is for you if the blinking lights persist even after the tank is full and the air lock is cleared. Descaling removes the mineral scale that blocks the sensors and restricts water flow.
You’ll need a bottle of descaling solution or a mixture of equal parts white vinegar and water. Start by emptying the water reservoir and removing any charcoal filter. Fill the reservoir to the max line with your solution. Place a large mug on the drip tray to catch the liquid. Run the machine on its largest brew size without a coffee pod inserted. If the machine stops midway, wait for the lights to stop blinking, then repeat the brew cycle until the reservoir is empty.
Once the solution is gone, fill the reservoir with fresh, plain water and run at least three full cycles to rinse the internal pipes. This ensures no vinegar or chemical taste remains in your next cup. If the lights continue to blink after a full descaling, the flow sensor may be faulty. This varies by model—check the label on the bottom for your serial number before contacting support. If you’re uncomfortable handling cleaning chemicals or opening the machine, contact a professional repair shop, as internal electrical components aren’t user-serviceable.
Deep clean the reservoir sensor
If the machine still shows the error, the magnetic float inside the tank might be stuck. This happens when soap residue or mineral scale prevents the float from rising as you add water.
To fix this, remove the reservoir and rinse it thoroughly with warm water. Look for the small, vertical cylinder containing a magnet. If it doesn’t move freely when you tilt the tank, it’s likely jammed. Use a soft-bristle brush or a toothbrush to gently scrub around the float to remove any grime. Don’t use sharp metal tools, as scratching the plastic can cause leaks. Once the float moves easily, fill the tank and place it back on the machine. If the float is missing or broken, you’ll need to replace the entire reservoir assembly. This is an easy fix that usually takes less than five minutes. If you have done this and the error remains, the internal sensor board might be failing, which requires a technician to replace.
What not to do
- Don’t use bleach or harsh industrial cleaners. These chemicals can corrode the internal rubber seals and leach toxins into your coffee, leading to permanent machine failure.
- Don’t tip the machine upside down to “shake out” the water. This can cause water to leak into the electronic control board, which will short-circuit the entire unit instantly.
- Don’t use a paperclip or wire to poke into the needles or valves. You risk piercing the delicate silicone membranes that control water pressure, which will cause the machine to leak or lose pressure entirely.
- **** While vinegar is a good cleaner, leaving it in the pipes for days can degrade the plastic tubing and cause cracks.
How to stop it happening again
Consistency is the best way to keep your brewer running smoothly. If you use filtered water, you’ll have fewer problems with mineral buildup.
| If you’re doing this | Do this instead | Why |
|---|---|---|
| Filling with tap water | Use filtered or bottled water | Reduces mineral buildup in pipes |
| Waiting for the tank to dry | Keep it at least half full | Prevents air from entering the lines |
| Using soap in the tank | Rinse with hot water only | Soap residue jams the magnetic float |
Many users mistake a slow drip for a failing pump. Before replacing parts, check if your water reservoir is seated firmly. A loose tank triggers a safety switch that restricts flow.
If the machine still struggles, perform a vinegar flush. Mix one part white vinegar with two parts water. Run this through a full cycle, then follow with two cycles of plain water. If the flow remains sluggish after this, the internal tubing or thermoblock likely has permanent calcification. At that stage, professional repair costs often exceed the value of the unit.
Frequently asked questions
Can I fix a Keurig that won’t stop blinking?
You can fix blinking lights by clearing an air lock or descaling the machine. Most issues occur because the unit fails to detect water, triggering a safety shutoff. If these steps fail, the internal sensor may be broken.
Why does my Keurig say add water when it’s full?
The machine displays this because the magnetic float isn’t detecting the water level. The float often sticks due to mineral buildup, preventing it from signaling that the tank is full. If cleaning the float fails, perform a full descaling cycle.
How long does it take to descale a Keurig?
The full descaling process takes 30 to 45 minutes to complete. You must run the solution through the machine, let it sit, and then rinse thoroughly with fresh water. Don’t rush the rinse cycles, as leftover solution will affect your coffee’s taste.
Is it safe to use vinegar to clean my Keurig?
Yes, a mixture of one part white vinegar and one part water is safe for descaling. Vinegar effectively dissolves the calcium deposits that accumulate in the internal pipes. Always follow the process with three full reservoirs of plain water to remove all traces.
What happens if I ignore the blinking lights?
Ignoring the blinking lights keeps the machine in a locked state, preventing it from brewing. The heating element stays off during flow issues to prevent the unit from overheating or burning out. Address the blockage immediately to avoid permanent damage to the pump.
Final Thoughts
If your machine still doesn’t brew properly after these quick fixes, it might be time to contact customer support for a deeper inspection. They’ll help you determine if there’s a mechanical fault that needs professional attention. Don’t worry, you’ll likely be back to enjoying your favorite morning coffee again very soon.
Related guides